Pages

Showing posts with label Recipes. Show all posts

Monday, April 15, 2013

Recipe Adventures #19: Whole Wheat PB Chocolate Chip Cookies

The non-whole wheat version of this recipe has been a favorite of mine for years.  My sister in law makes the BEST cookies in the entire world and she gave me this recipe.  Of course mine don't taste like hers, but each time I make them, it reminds me of her.  She currently is living in Mozambique, Africa so we don't get to eat her cookies anymore.  (Insert sad face here...)  

I also feel a bit guilty sending cookies in for my daughter's snack since they aren't very nutritious, so I modified the recipe so it was whole-wheat and it made me feel a bit less guilty.  

Whole Wheat PB Chocolate Chip Cookies

1 c. butter
3/4 c. evaporated cane juice
3/4 c. sucanat
2 eggs
1 t. vanilla
1 c. Jif Natural PB
2 c. whole wheat flour (I used hard red wheat)
2 t. baking soda
1/2 t. salt
12 oz semi-sweet chocolate chips

Mix sugars, butter and eggs together.  Add pb & vanilla.  Sprinkle the soda and salt onto mixture, then add flour.  Pour in the choc chips. Bake at 375 degrees for about 9 mins on a baking stone.  Remove from oven and let set on stone for approx 5 mins to firm up.  

Enjoy! :)

Wednesday, April 3, 2013

Recipe Adventures #15: Spinach & Parmesan Omelet

Well, since I'm feeling super-ultra-fat-and-flabby this week, I decided to start trying to incorporate more veggies & fruits into my meals and concentrate on making everything I eat just a bit more healthy in an attempt to just maybe see the scale move in the right direction.  And stay there.

So I did a quick search for healthy breakfast recipes this morning and found one for a spinach & Parmesan omelet on www.fitness.com but of course tweaked it a bit.  (Hey, it isn't called Recipe Adventures for nothing!)

Spinach & Parmesan Omelet

1 c. spinach, chopped
2 eggs
1 small clove garlic, minced (or less if you don't care for it)
Dash of Tabasco
2 tsp. Parmesan Cheese
Mozzarella Cheese, shredded
Salt & Pepper to taste

Add the spinach to a heated frying pan and saute with the garlic until wilted.  In small bowl, scramble the eggs with Tabasco sauce.  Add to the pan of spinach.  If you don't have a small pan (like me) I just made sure to keep pushing the egg into a smaller omelet-sized circle. Sprinkle with salt & pepper.  Cook 2 mins then flip and Parmesan cheese.  Cool 15-30 seconds.  Fold over and sprinkle a bit of mozzarella cheese on top.  

The Verdict: I thought it was good, but I need to get over my urge to not like it because there's green stuff in my eggs, ya know?  I like spinach and I like eggs, but I sort of act like a 5 yr old all over again when I see them together.  It's one of my quirks.  And I'm learning to overcome them.  I made one for hubby and he said he liked it so I guess this one is a keeper.  I think next time I would use less garlic (I could really use a breath mint right now) and less Parmesan cheese (totally overlooked the 2 tsp thing and just poured it on top...big mistake).

Once again, I'm sorry I didn't take a picture of it!  It really was beautiful!  I thought about it mid-way through eating it, but hubby was in the kitchen and I didn't want to deal with him asking why on earth I was taking a picture of my breakfast.  (He thinks blogging is silly.) I will try to take pics of future recipes!! 


Recipe Adventures # 14: Frosty Protein Shake

A friend of mine pinned this recipe on Pinterest and I thought it sounded like a great recipe to add to my post-run fuels, so I gave it a try.  I made 2 mistakes when I made this...

1.  I made it when the kids where home.  So when they asked what I was making and I told them something that tasted like a Wendy's Frosty, they were all jacked up asking if they could have one.  For some reason every time they see me getting out the blender they know I'm making a smoothie of some sort and rush to ask if they can have one.

2.  I didn't add enough sweetener.  I was going gung-ho-healthy at that particular moment and didn't want to add any unnecessary calories.  Let me tell you, those calories were indeed necessary! 


Here is the original recipe and what I actually used is in parentheses...


Frosty Protein Shake
3/4 c. almond milk (6 oz of whole milk)
15 ice cubes (maybe used 13 ice cubes)
1 scoop vanilla protein powder (same)
1-2 Tbsp. cocoa (2 Tbsp)
Sweetener of choice - 1/4 frozen banana or stevia  (I used 1/4 banana, not frozen)

Give it all a whirl in your blender and enjoy!  Providing you like the taste.

The Verdict:  I didn't like this.  It didn't taste very sweet at all.  To me it tasted like chocolate water.  BLECK.  I actually happily handed my cup over to the kids who were ecstatic about it...until they tasted it.  Then they decided to add extra evaporated cane juice (yes, my kids are smart) to it and said it was awesome.  Not sure I believe them.  Since I had the blender out and my heart set on a chocolatey smoothie, I opted for my Chocolate Banana PB Protein Smoothie instead and thoroughly enjoyed it!  (You can find the recipe HERE.  

Monday, March 25, 2013

Recipe Adventures #13: Brownie Mix

I don't know if you've noticed but there seem to be a TON of yummy looking recipes on Facebook right now!  I can't keep up with them all and have been copying them onto recipe cards like crazy in hopes to one day make them.  

We had company over yesterday and I decided to try this one out...mainly because I was in the mood for Brownies.  This one is a recipe to make your brownie mix instead of buying the boxed ones from the store.  I  am all about eliminating boxed foods from my pantry and any time you make a recipe from scratch instead of buying it almost always saves you money.  This recipe was right up my alley!

Brownie Mix
1 c. sugar
1/2 c flour
1/3 c cocoa
1/4 t. salt
1/4 t. baking powder

You can make several of these mixes ahead of time and store them in mason jars or quart-sized storage bags and have them on hand to make in a jiffy or just make the recipe as needed.

To Bake: Add 2 eggs, 1/2 c. oil, and 1 t. vanilla extract to the dry mix.  Stir well.  Spread into a greased 8x8 or 9x9 baking dish and bake at 350 degrees for 20-25 mins.


The Verdict:  These were surprisingly yummy!  The color isn't quite as dark brown as store-bought mixes so I was a little skeptical when I took it out of the oven.  But it's pretty darn close to the taste of  store-bought mixes!  This one is a keeper and I don't think I will be buying brownie mixes again!

Saturday, March 23, 2013

Recipe Adventures #12: PB Oatmeal Cookie Dough Oatmeal

I found this recipe at Peanut Butter Fingers and thought it sounded yummy enough to try.  I've seen recipes for overnight oatmeals before but have never taken the time to try one. 

PB Oatmeal Cookie Dough Overnight Oats
3/4 c old-fashioned oats
1/2 c milk
1 1/2 Tbsp peanut butter
2 t. brown sugar 
1 t. chia seeds

Stir all of the ingredients together in a bowl.  I used a larger cereal-type bowl and put plastic wrap over it before sticking it in the fridge.  Make this the night before and stick it in the fridge to enjoy the next morning.  Before eating, mix a bit more milk with it so it's not so thick.  Do not omit the chia seeds.  You can also top this with fresh berries, chocolate chips, etc. 

The Verdict:  Hmmm...not sure how I feel about this one just yet.  I think I need to try it again.  I had to make a special trip to the health food store to pick up the chia seeds and found out quickly they are expensive little buggers!  I paid $6.99 for 8 organic oz of them!  BUT 8oz should last me a long time, thank goodness!  Anyways, I think the thing that bugged me the most about this was that it was cold.  The instructions didn't say to heat it up so I ate it cold.  And it tasted like cold oatmeal.  Maybe I should warm it up next time to see if I like it better.  Or maybe just let it get to room temperature.  Who knows.  I'm sticking this recipe in the "2nd Chance" pile to try again later.  

If you happen to try it, let me know what you think of it!

Today's 7-Miler

Another long run DONE!  I was REALLY dreading running 7-miles today...especially when I saw the forecast saying it was going to be a whopping 28 degrees while we were running.  BRR!  But it had to be done so I did it.  And it actually was enjoyable!  Jenny and I live approximately 3 miles apart so we started at my house and ran just past her house and then back to my house.  It was a nice change of scenery and I actually warmed up enough to just run in my long sleeved shirt (with tank underneath)!  I'm feeling a little sore right now but not as bad as I had expected.  Thinking a nice hot bath is in order!  

When I got home I decided to try some homemade chocolate milk as my post-run fuel.  Remember how I said I'd never be able to keep already-made chocolate milk in my fridge long enough for me to actually drink it?  Well, I decided to buy a container of Nesquik Chocolate Milk mix instead.  And I hid it.  Yep, you read it correctly.  I hid it in my lazy susan...and so far it's gone undetected by the hubby and kiddos.  Yay!  


Can you spot the Nesquik? I at least turned the container around so the Nesquik bunny was facing backwards so he wouldn't be easily spotted!  Aren't I evil?  Or maybe just very smart.

So I got out my Tupperware Shaker Bottle which I LOVE and filled it halfway with milk, then 2 Tbsp of chocolate mix, then a scoop of protein powder.  Shake, shake-a-roo and voila...a chocolatey protein shake!   I think I need to tweak the measurements of the powders, because it seems really sweet and the protein powder left an aftertaste. Next time, a little less of both, I think!

Not sure what the rest of our day holds...today is hubby's birthday and he's at an auction.  Maybe we will catch a movie later and just relax.  That's my kind of Saturday!  


Tuesday, March 19, 2013

Recipe Adventure #11: Broiled Fish Parmesan

Remember that All Recipes mini-mag I told you about last week?  Well, there was another awesome recipe in it that we tried last night for dinner.  It was called Broiled Tilapia Parmesan.  We didn't have Tilapia, but we had a box of Pollock that I got on sale a couple of weeks ago, so I substituted it and changed the name to Broiled FISH Parmesan!  Sorry I didn't get a picture of the fish...we had someplace to go last night and I guess I was more concerned with putting a hot meal on the table instead of snapping a pic.  Forgive  me?  Good.

Broiled Fish Parmesan

1/2 c parmesan cheese
1/4 c butter
3 Tbsp mayo
2 Tbsp fresh lemon juice
1/4 tsp ground black pepper
1/8 tsp onion powder
1/8 tsp celery salt
2 lbs fish fillets

Preheat broiler.  Grease your broiling pan or cover it with foil.  (I poked holes in the foil for all the fish juicies to fall through).  In a bowl, mix all the ingredients except the fish and set aside.  Place fish on the broiling pan.  Broil a few inches from the heat for 2-3 mins.  Flip over and broil a few more minutes.  Remove from oven and cover with the cheese mixture on the top side of the fillets.  Broil 2 more mins until topping is browned and fish flakes with a fork.  Do not overcook.

Variations: Can use sour cream in place of mayo. Can sprinkle Old Bay seasoning on the fish before broiling.

I don't think I had my pan close enough to the heat because I had to bake mine longer...and also due to my fish being semi-frozen yet.  So my cooking time was probably doubled...however me and the broiler have a long history of burning things so maybe it was a good thing it wasn't too close!

This says it is 4 servings.  I didn't weigh the fish out (I bought a 10 lb box), but I just filled up the pan in a single layer (which was probably 6 -7 fillets) and had enough cheese mixture to fully cover them.

The Verdict: During the preparation stage, my youngest said, "Yay!  I love fish!" and my older daughter said, "Eww...I don't like fish."  I ignored the negative comment and continued on.  (I don't allow for picky eaters in my house) Once the fish was done, EVERYONE (including Miss Picky) ate a 2nd helping.  When I asked hubby how it was, he replied, "This is Awesome!"  So I guess this recipe is a keeper!  I personally loved how gourmet this dish looks!  It was very easy to make yet looks like it was prepared by a chef!


Monday, March 18, 2013

Recipe Adventure #10: Roasted Brussels Sprouts

Let me start out by saying that a few years ago, I didn't really vegetables.  I grew up on the basic ones: corn, green beans, potatoes, and occasionally peas.  And with the exception of the potatoes, they were almost always from a can.  I ate them and honestly didn't mind them, but when I became an adult and wife and mother, at some point I started wanting to broaden my horizons in the vegetable world.  I started eating salad (yes I didn't even have a salad until I was an adult) some which lead me to love fresh spinach.  Then I tried a spaghetti squash.  Then tomatoes. Then mild banana peppers and black olives (especially on my Subway Italian subs!) Then I tried the vegetable that was WAY out of my comfort zone....BRUSSEL SPROUTS.  One of my running buddies, Shannon, told me how good they are.  I was VERY skeptical.  But one day I decided to try them.  And I had to agree...they were yummy!  And the funny thing is that I actually find myself craving them from time to time.  I NEVER in a GAZILLION years thought I'd ever eat, let along CRAVE a brussel sprout!

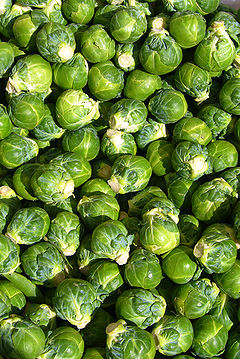
BTW - if you don't know what brussel sprouts look like here's a pic...of a lot of them. Don't make that many...you would most likely never eat another one again if you consumed all of these.  Just sayin'. Anyways, they look like cute little baby cabbages.  But way tastier.


Here is how I make them...

Roasted Brussel Sprouts
Brussel Sprouts - any amount desired. Be forewarned that they do shrink up a bit while roasting. 
Lawry's Seasoned Salt
Olive Oil
Parmesan Cheese

*Heat oven to 450 degrees.

*Wash the brussel sprouts. Cut the stem end off of each sprout.  Then cut the sprouts into 4ths or 6ths or whatever size you want.  It also depends on the size of the sprouts.  Sometimes you can find small ones and other times they are larger.  If you get big ones, just chop them more...like in 6ths.  And FYI - I think the smaller ones have more flavor, but the big ones are good too.  

*Place the chopped sprouts on a jelly roll pan or bar pan and drizzle with olive oil.  Stir the sprouts and then drizzle some more.  

*Sprinkle with seasoned salt. Stir again.

*Bake sprouts in heated oven for 15-20 mins until some of the leaves are good and browned.  I usually set the timer for 10 mins, then stir them and bake another 10 mins.  Here are what mine looked like:


*Remove from oven and let cool a bit.  When serving, sprinkle with Parmesan cheese.  

Not only do these taste yummy, but I just LOVE putting them in my cart at the store and feeling like I eat really healthy foods all the time.  Corny, I know.  

Now that I've mastered brussel sprout-eating, I wonder what vegetable I will try next!  Oh yeah...and these can be grown in gardens in Ohio too...so if you try them and like them, you can grow your own!


Saturday, March 16, 2013

Today's Run & Post-Run Fuel

Well, today I had to run 6 miles for this week's long run in our half marathon training.  I'm not going to lie...I was really dreading it.  I thought it was going to be really cold, but it actually was quite warm (a whopping 39 degrees).  I met up with two running buddies, Jenny & Shannon, who are also training for the Rite Aid Half-Marathon...and that makes long runs more bearable!  It's so nice to get some adult conversation in while also crossing another training run off my list!  It really is cheaper than therapy!  We completed our 6 miles in 1 hr 7 mins...and that included some faux water station breaks...which we walked "through".  Not too shabby!  I think the past two days of rest really helped me to feel ready to hit the trail running...literally!

Once I got home I took a shower and then my tummy started growling big-time, which reminded me that I needed to fuel my body after burning off 600 calories.  (Goodbye cereal from this morning!) I would love to have chocolate milk on hand for post-run fuel, however with three kids and a hubby who adore chocolate milk...I'm sure it wouldn't last long in this house!  So I opted for another great snack.  Not sure it's the proper proportions of carbs, protein, yada yada that you need following a run, but it tamed the hunger pangs and I'm sure the protein in the peanut butter was beneficial in some way.  (FYI-I'm so NOT a nutrition expert!)

Jen's Fave Snack

Put 1 Tbsp of peanut butter (I used my fave Jif Natural) in a bowl and nuk it for 30 secs.  Then slice up a banana on top of the peanut butter and add a drizzle of honey on top of the banana.  And that's it!  So simple and sooooo very delish!  And I think it's pretty healthy too!  This could seriously be eaten as dessert!

Sorry I didn't get a picture of my snack...I scarfed it down before I could take one!

Have a great Saturday! :)

Friday, March 15, 2013

Recipe Adventure #9: Luscious Lemon Lush

Wow, do I have an awesome recipe for you!  Yesterday I received my Fitness magazine in the mail.  With it was a mini-magazine designed to give readers a glimpse into a new magazine called All Recipes that will be launching soon (if it hasn't already).  I looked through it and one recipe really caught my eye:  Lemon Lush.  The moment I laid eyes on it I knew I had to try it!  And I'm so glad I did!  It was super easy to make and uses ingredients that I usually have on hand (with the exception of the lemon pudding, but I may just have to start keeping a stock in my pantry for when I get a hankering for this!!)  This is my new favorite dessert!

I would like to introduce you to my new friend, Lemon Lush....


Lemon Lush

1 c. butter
2 c. all-purpose flour
2 (8 oz) pkgs cream cheese, softened
1 c. sugar
2 (3.4 oz) pkgs instant lemon pudding mix (can substitute with1 box of vanilla) 
3 1/2 c. milk
1 container Cool Whip

Heat the oven to 350 degrees.  Softened butter a bit and mix into the flour with your hands. (or use a pastry blender).  Press the crumb mixture into the bottom of a 9x13 baking pan.  Bake for 20 mins.  Remove from oven and place on cooling rack.  Meanwhile, soften the cream cheese in the microwave.  Once softened, add the sugar and beat until well blended.  In a separate bowl, mix the pudding with the milk and whisk until well mixed.  Once the crust is cool, spread the cream cheese mixture on top of the crust.  Spread pudding on top of the cream cheese.  Spread cool whip on top of  pudding.  Chill until set....if you can wait that long!

Of course I can never just follow a recipe to the letter no matter how hard I try.  This time I only picked up ONE box of lemon pudding at the store instead of two.  (I'm not a very detail-oriented person).  So I improvised and used a box of lemon and a box of vanilla that I had in the cupboard.  I really liked it.  I was afraid that it would be too lemony but the vanilla really make the lemon flavor more subdued.  I think the all lemon version would be ultra yummy in the summer...and maybe even after freezing the dessert a bit!  Yum!  

The Verdict:  This was a hit!  The only negative comment I got was from my son who said the crust was kind of dry.  And it is, however the creaminess of the rest of the dessert makes up for it.  Hubby took a bite and said, "Mmmm!" and gave me a kiss, so I think it was a hit!  

Wednesday, March 13, 2013

Recipe Adventure #8: PB Granola

I hereby declare today as PB Day!  I started the morning out with PB Pancakes (see previous post) and just made a batch of PB Granola.  Hmm...how shall I eat my PB for dinner?  

I love to make granola.  It can be pretty pricey in the stores and, being the cheapskate I am, I just can't bring myself to buy it when I know I can make some that's comparable in taste and way cheaper!

I came across this recipe at Peanut Butter Fingers and it looked so simple I just had to make it.  It also had a bit to do with a container of plain yogurt sitting in the fridge begging to be eaten.  Granola is sooo yummy on yogurt!  


Here's the recipe:

PB Granola

2 T. Creamy PB (I used my fave Jif Natural PB)
2 T. Honey
1/4 t. cinnamon
1/4 t. vanilla 
1 c. oats.  (I used old-fashioned oats)

Heat your oven to 325 degrees.  Put the pb and the honey in a bowl and nuk in the microwave until melted.  Stir in the cinnamon and vanilla.  Then add the oats and stir to coat.  Spray a cookie sheet with nonstick spray (or olive oil) and spread the granola goodness out on the sheet.  Bake for 15 mins and let cool until crunchy (if you can wait that long!).  

The Verdict: Hubby and I really like this and, in fact, we've been munching on it this afternoon...even without the yogurt.  I love that the recipe uses all natural ingredients.  And that I made it myself.  This one is a keeper and I can't wait to try it out on some yogurt this afternoon for snack!  Also can't wait to see if the kids like it!  

BTW - I did double the recipe.  Next time I would make an even bigger batch because I'm sure this batch won't last long!  


Recipe Adventure #7: PB Pancakes

This one is a keeper!  I love pancakes.  They are fairly quick to mix up and feed the kiddos before they head to school.  And if you make them with whole wheat flour, they keep you full longer too!  And I love peanut butter because, well, I just do!  I also love this recipe because I normally put peanut butter ON my pancakes to make them stick to my ribs better (aka keep me fuller longer)...so this is a win-win!!

I found this recipe at Eat At Home Cooks and I'm so glad I did!  Below is the recipe I used.  I made some adjustments based on wanting to make the recipe just a tad bit healthier.


PB Pancakes

2 c. whole wheat flour (or any kind of flour)
1 t. sea salt
4 Tbsp. evaporated cane juice (or white sugar, honey, or preferred sweetener)
2 eggs
5 t. baking powder
1 c. peanut butter (I used Jif's Natural Pb)
4 Tbsp. coconut oil melted (or veg oil)
2 1/4 c. milk

I mixed all the wet ingredients together.  Then I added the salt and baking powder.  Lastly I added the flour. Stir it up real good and plop them on a hot griddle (I heated mine to 350-375 degrees).  Once they are bubbly on top, flip them.  Voila!  PB Pancakes!

We served ours with maple syrup.  Yummo!


Monday, January 14, 2013

Recipe Adventure #6: Scrumptious Ham Loaf

Hello, my name is Jen and I am addicted to Ham Loaf.  

It is on my list of Ultimate Comfort Foods.  I like it because it's not super common so it's a real treat when we do have it.  However I didn't have a recipe.  I would just sort of throw a bunch of different ingredients into a bowl and pray it tasted good.  Sometimes it was wonderful and other times is was just ok (which is super disappointing when you can't wait to sink your teeth into it!)  After doing some searching online, I came across a recipe that makes the best ham loaf in the world.  I'm serious when I say that.  Ham loaf is not a joking matter.  

I have no idea where I got the recipe online so I can't give credit where credit is due...sorry to the amazing person who created and/or posted this recipe online!  If I knew who you were I would probably kiss you.

Here is the recipe:

Ham Loaf
2 eggs
1/2c milk
1 tsp worcestershire sauce
3/4 c dry bread crumbs (or graham cracker crumbs)
1 1/2 tsp ground mustard
1/4 tsp salt
1/4 tsp black pepper
1 lb ground ham
1 lb ground pork
1 can sliced pineapple (reserve juice)
1/2 c brown sugar

Combine all ingredients except pineapple and brown sugar. Make into loaf after well mixed.  Place in baking dish.  Place slices of pineapple on top of the loaf.  Mix brown sugar and 1/2 c pineapple juice and pour over hamloaf.  Bake at 350 degrees for 1 hr 15 mins.

*Do not just go down through the ingredient list throwing everything in the bowl to mix up...like I did.  Once I added the brown sugar I then started reading the instructions to NOT put the pineapple and sugar into the mix.  (I was smart enough to know the pineapple didn't go in the mix thank goodness!)  So I had to add more sugar with the juice, which resulted in a sweeter loaf, but it was still divine!  

*Also, in your extreme excitement about eating this ham loaf, don't overlook ingredients.  As I was typing this I realized that I had forgotten the worcestershire sauce entirely!  But like I said, it was still Dee-vine!

Bon Appetit!

Recipe Adventure #5: Cheddar Bacon Ranch Chicken Pasta

Something sounded soooo yummy delicious about chicken mixed with cheese, ranch, and bacon!  I couldn't wait to try it!  I used THIS RECIPE.  However, I of course had to make a few adjustments.  I used bacon from the pig we raised last fall, and I didn't have as much ranch dressing mix as I thought AND I didn't have a short pasta so I used a whole-wheat linguini.

THE VERDICT:  This dish lacked flavor.  It definitely needed more ranch mix.  And I would scratch the whole wheat pasta next time and use regular.  I was disappointed big time.  I think I had in my head that it would taste like a carbonara sauce, but it didn't.  So all the leftovers are sitting in my fridge waiting to be eaten.  And leftovers that don't taste great end up as the unidentifiable food items in the back of the fridge that you forget about and find them later growing your child's next science project.  Thinking I will try to revamp it and add some more cheese and ranch mix (I would like to try making my own this time!) so it doesn't go to waste.

Monday, January 7, 2013

Recipe Adventures #3 & #4: Texas Roadhouse Rolls & Cinnamon Butter

Four new recipes in one week...wow!  I'm on a roll...literally!  I was craving some yummy white bread...or in this case rolls, so I tried out a copy cat recipe for Texas Roadhouse Rolls and Cinnamon Butter!


The recipe for the rolls & butter can be found HERE

These seemed like they were labor-intensive, but I was surprised at how quickly I found myself taking these yummy rolls out of the oven.  And eating them.  Lots of them.  Did I ever tell you I'm a sucker for warm white bread?  Well, I am.  It's the ultimate comfort food in my opinion!


And those of you who know me well know that me and bread-making haven't exactly made friends yet.  Very rarely does a bread recipe actually turn out well for me.  And I thought this one was another one for sure...but it totally would have been my fault..not the recipe's.  The recipe calls for 3 Tbsp melted butter added into the dough.  So I put mine in the microwave and nuked it but it wasn't quite melted yet, so I nuked it a bit more.  Then forgot about it until I was already kneading the dough.  So I tired adding the butter at that point and just crossed my fingers.  And they turned out anyways!  So I would call this recipe a no-fail!


THE VERDICT:  We really liked these rolls!  I don't think they taste exactly like Texas Roadhouse's rolls, but they are still good.  And it made 36 rolls!  I ate a few (ok, more than a few) and decided to serve the remaining rolls at our small group gathering that evening and everyone like them!  The cinnamon butter was super easy to make and it made A LOT of butter.  So I would recommend cutting the recipe in half.  Unless you are making to give as gifts.  It's definitely more butter than you will use on one batch of these rolls...so keep that in mind!  The butter was good, however I personally thought it was way too sweet.  So I would try cutting the amounts of powered sugar and honey down a bit and add more in after trying it if you think it needs more sweetness.

Friday, January 4, 2013

Recipe Adventure #2: Creamy Chicken Spaghetti

Two new recipes in one week!  I'm such an over-achiever!  This time I made Creamy Chicken Spaghetti.  You can find the recipe HERE.  This was one of those recipes where, after reading down through the ingredients list, I realized that I had all the ingredients needed...so why not make it?  

The Verdict:  Hmm...this one has mixed reviews.  Hubby loved it and I thought he would hate it.  The kids thought it was ok...and I did too.  It's definately creamy, but I think the look of it was deceiving.  My mind was expecting it to be cheesy tasting but it wasn't.  I did make a small adjustment...I didn't use tomatoes with chiles in them...I just used petite diced tomatoes.  And I didn't grill the chicken; I fried it.  It's winter in Ohio and who wants to stand outside to grill a few chicken breasts in 6 degree weather?  Not this gal.  Although I do think the grilled taste would have added a bit more to the flavor of the dish.  I guess I thought it was a bit bland.  I think I will try this one again and follow the directions completely and then give it another try before tossing the recipe altogether.

Recipe Adventure #1: Glazed Doughnut Muffins

The New Year is off to a great start cooking-wise!  Have I introduced you to my new best friend?  Her name is Pinterest.  She has LOTS (like a bazillion) of recipes on her site and I just can't stop pinning them!  And, so I down turn into a Pinterest recipe hoarder, as part of my 2013 goals I have decided to try 52 new recipes...and I bet they will all most likely come for there!

I made Glazed Doughnut Muffins.  You can find the recipe here:  HERE.  I whipped up a batch of these and they were easier than I thought.  I especially love how you dip the tops of the muffins into that yummy glaze and it hardens just like on glazed doughnuts!  I know, it doesn't take much to amuse me....

The Verdict:  My kids liked them!  And they were gone in a day.  They made a nice big muffin, not the sort of flat wimpy muffins that some recipes produce.  I don't habitually use white flour, so I made them with whole wheat flour.  To me they had a drier texture and I think it was the flour's fault.  So I would like to try them with unbleached white flour sometime and I bet they would be even tastier!  I will keep this recipe in my recipe box for sure!

Friday, August 31, 2012

Need a Chocolate Fix?

I have to share this recipe with you.  But beware...it's addicting!  And one you eat too much, you'll be sick (I am speaking from experience). 

 Meet Puppy Chow.  It's so yummy and oh so simple to make! 

Puppy Chow
1 c. chocolate chips (I used milk chocolate chips, but I'm sure semi-sweet would work too)
1/4 c. butter
3/4 c. peanut butter

Mix those 3 ingredients in a microwave safe bowl.  Don't let it get too hot or you'll scorch the chocolate...and that would be tragic.  I think I melted the butter separately and then added it to the chocolate and pb, then nuked it for 30 seconds, then stirred, then 30 seconds more and it was done! 

Pour that mixture over 8 c. Rice Chex cereal.  I just dumped the whole box in.  (I'm not the type to really measure things if you haven't figured that out yet!)

Toss until cereal is coated.  Sprinkle with 2 c. powered sugar. 

ENJOY! 

*Sorry I didn't include pictures with this post, but I was a bit too busy stuffing my face test-tasting it that I just couldn't find the time to dig out the camera.  And I didn't want to stop stuffing my face get chocolate on it.  I assure you it had NOTHING to do with the fact the batteries for the camera are AWOLHave I mentioned that I need to organize my ENTIRE house?  Yeah, well, I do.  Please don't judge me! :) 

Monday, May 21, 2012

Smoothie, Anyone?

I have a new obsession...smoothies!  A few months ago, I started eating protein bars after my class at the gym because I was starving and would usually overeat once I got home because I was so famished.  A friend told me about protein powder too, where you mix the powder with water or milk for a fast "shake".  I picked up some Jillian Michaels Protein Whew Something-or-other at Stuff Mart and decided to give it a try. I haven't tried it with water yet, and it's ok tasting with milk, but I don't love it.  If you've ever had Slim-Fast shakes, this shake tastes pretty bland.  (But bland can be good because that means there's less sugar and artificial taste-enhancing gunk in it!)  Anyhoo, I saw some recipes on Facebook a few weeks ago that a friend was posting to another friend.  They had both joined an up & coming weight loss program (which shall remain nameless) where you drink shakes twice a day, like the Slim-Fast plan.  But these shakes sounded AMAZING!  So I did some research and compared their powder with the Jillian powder that I was using.  I found that they were very similar nutrition-wise, and that you had to use only 1 scoop of the Jillian powder compared to 2 scoops of the other powder.  And the Jillian powder is way cheaper!

Why am I telling you all of this?  Well, first of all, I'm bored, and secondly, I'm excited about my new found smoothies!!  I want to share my favorite shake recipe with you.  It's ultra yummy and approximately 365 calories.  It makes a great breakfast or lunch on the go.  I just had one for a mid-afternoon snack because I sort of snacked through lunch and was starving come 3 pm today! 

Ok, I'll quit rambling and give you the recipe!

Chocolate PB Banana Protein Smoothie

8-10 oz of milk (I use 8 oz to cut down the cals a bit and because it really is filling, so 10 oz is a bit too much for me)
1 scoop Jillian protein powder (I use vanilla, but you could probably use the chocolate too)
1/2 banana, sliced (or a full one depending on whether you have someone to eat the other half or if it will just get wasted)
1 Tbsp PB (I use my homemade natural PB that has a bit of coconut oil and honey it, but regular creamy PB works well too!)
1 Tbsp (or less depending on your taste) instant chocolate pudding mix

Throw it all in the blender and blend.  Then pour into a cup and enjoy!  I think the pudding mix and banana make this shake a bit thicker, so if you popped it in the fridge or freezer to chill it, it would taste like a milkshake.  I just love this recipe!  I'm hooked!  There are lots of other recipes that are yummy and I will share them with you too in future posts.  Let me know if you try this one and if you liked it.

Tuesday, January 31, 2012

My Absolute Favorite Breakfast

Last night as I was doing some dinner prep, I decided to throw together a quick and easy breakfast casserole for this morning.  It's called French Toast Casserole and my family loves it!  Last night my son (who's 11) saw that I was making it and immediately got excited and rushed to give me a hug and thank me! Yeah...that's how much we love this dish! 

The cool thing about this casserole is that several can be made ahead of time and popped into the freezer.  I got this recipe from a freezer cookbook called 30 Day Gourmet after borrowing it from a friend who enlightened me about freezer cooking.  The book itself is great if you've never heard of freezer cooking or want gobs of recipes that are freezer proof.  The book will explain how to freeze food because there are different methods...did you know that?  If not, you should totally check out that book!  The book centers around having a cooking day or two each month with a group of friends and putting a months worth of meals into the freezer.  For me, that's a bit unrealistic (not to mention a TON of work), however some friends and I are planning to get together to do a smaller version and just put a few meals (probably 6 or so) away in the freezer.  (Mental Note:  I need to call those friends and set up a day and time to make it happen!) 

Anyways freezer meals are awesome to have around!  They are very handy on those days when you know you are going to be gone all day and not have time to prepare dinner.  Or when your church's Meals Ministry calls to ask you to take a meal to someone who is ill or just had a baby.  And sometimes they come in handy when you are in a cooking rut and just cannot think of anything to make for dinner.  Or when you're just plain lazy. 

I will get off of my soapbox now and get back to the recipe...sorry!

French Toast Casserole

1 lb Italian French Bread, cut into cubes
8 oz cream cheese

1/2 c sugar, divided

1/2 t vanilla or almond extract

1/2 c pecans (or walnuts, but nuts are optional)

4 eggs

2 C. milk

1 t. cinnamon

2 T butter

This is the bread I use from Walmart.  Any of there long french-bread type loaves will work.

FYI:  I never pay full price for the loaves.  They often go on "clearance", and that's when I buy them.  I buy a few and stick them in the freezer.  They also come in handy when making garlic bread...but that's a whole other post!

Place half of the bread cubes in a greased 9x13 pan.

Place the cream cheese in a microwaveable bowl or measuring cup. Cover the container with plastic wrap and cook until completely "melted". Sitr half of the sugar and all of the extract into the cream cheese.


Spoon the cream cheese mixture over the bread cubes (it will not completely cover them). Sprinkle the nuts over the cream cheese layer.

Top with remaining bread cubes. In a bowl, beat the remaining sugar, eggs, milk, cinnamon, and melted butter together. *I don't put quite all the milk in because hubby complained of it being mushy. lol


If you want to freeze this for later, slide the pan into a 2 gallon breezer bag, seal and freeze.


To serve: (If frozen, thaw completely.) Bake at 350 for 35 mins or until browned. Allow to sit at room temp for 5 mins before cutting. Serve with warm syrup (or fruit syrup...see below)


Home Made Fruit Syrup

Fruit, canned, frozen, or fresh - 1 2/3c or 14.5 oz (drained of liquid)

1 c. sugar

1 c corn syrup or honey

1/2 tsp vanilla or almond extract.

Chop fruit into pieces no more than 1/2 inch square. Combine fuit, sugar, and corn syrup or honey in saucepan. Bring to boil sitrring occasionally. Reduce heat to simmer and cook for 10-15 mins. Reove the sauce form heat and stir in extract. Serve warm. *I made red raspberry syrup for the frech toast casserole before and it was really yummy!


I made ours with raspberry syrup.  I was so excited to indulge in this yummy breakfast this morning...but after the first bite I realized I couldn't taste anything thanks to my stuffy nose.  Talk about depressing.  I was going to go for seconds, however I'd rather wait until tomorrow when I can (hopefully!) taste it.  That is, if there is any left by tomorrow morning!